Although the explainer animation has been available to view for some time, we wanted to make a more comprehensive explanation of Domino Clamps here in a blog post and with the benefit of images as well, so that we can go into more detail than we might justify editing into a video.
Parts of the Domino Clamp
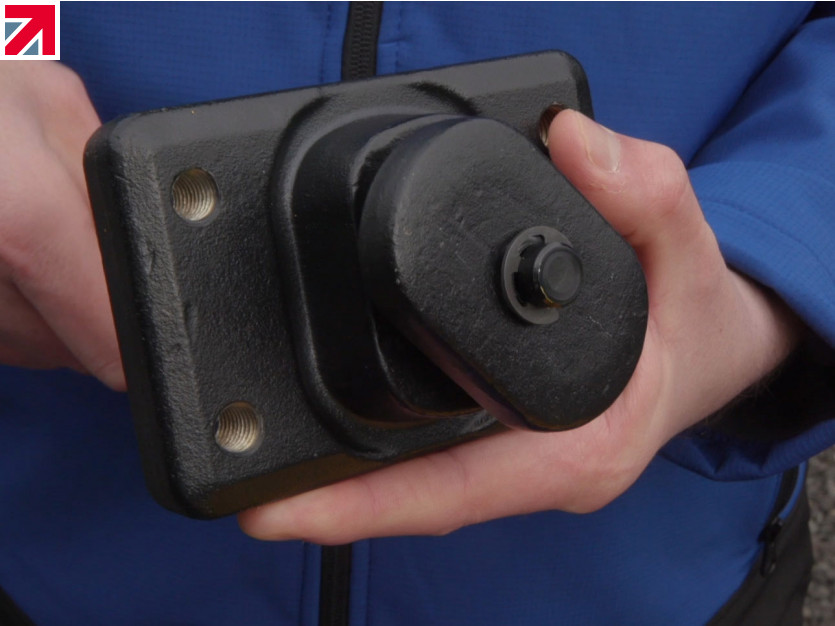
The Domino clamp consists of two main parts which have been drop forged in the UK from2 EN3B grade steel. We refer to the larger of these as the front plate, (or just the Domino) and the smaller piece which rotates behind as the clamping plate. On the rear of the front plate is the boss; a stadium shaped lump of steel into which is set the ‘female’ half of the cam mechanism. The other ‘male’ half of the cam mechanism is on the clamping plate. In the front face of the Domino are four M12 threaded holes. Once the Domino is clamped onto the container, one or more of these can be used to bolt other items to the container. The indented vertical line serves as a centre and vertical marker and will come into its own further down the line with certain bolt-on adapters. It also completes the unique domino appearance.
Connecting the two steel halves is a custom, high-tensile 10.9 bolt which we refer to as the tightening bolt or the central bolt. This sits in a countersink machined into the front face of the Domino so that it sits flush and out of the way once it is done up, and is set with a 10mm hex socket for tightening and untightening the Domino into position in the corner casting. On the tail of the bolt is a circlip which prevents the bolt from being undone fully, and rotates the clamping plate back into an upright position for removal from the corner casting.
In terms of protection, the two main parts of the Domino Clamp are dual protected; firstly electroplated with zinc, and then finished with a coat of black Xylan, for additional impact and corrosion resistance. With these coatings, and with care, your Domino Clamps should last you a very long time and many many uses.
Where does the Domino Clamp fit?
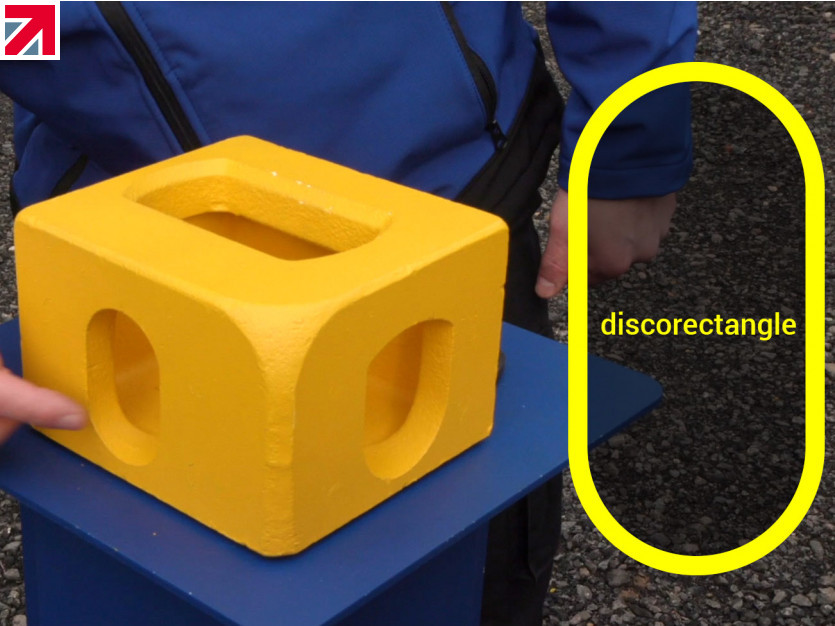
The Domino Clamp is designed to fit into either of the holes on the sides of all ISO standard shipping containers and any other portable unit which uses ISO standard corner castings. Most of these are the stadium shape variety, which you’ll find on all four corners of the long sides of a shipping container, and the lower two holes on the shorter sides. A differently shaped hole is found on the upper corner castings on the shorter sides, and since this looks kind of like a shield, we refer to it as such.
FUN FACT: In geometry, the stadium shape actually goes by two other names. The first is ‘obround’ and the ‘other, our personal favourite but which we don’t use because everyone thinks we made it up is “discorectangle”
There are much larger holes on the top face of upper corner castings underside of the lower ones. Although the Domino will fit in these, it is not tested to do so, so we STRONGLY advise that you not to use it here. We are looking into the possibility of making a new version which can be used here, or an adapter to make it safe to use our existing product in these holes. If you need something to clamp into these holes, please contact us
Installing the Domino Clamp.
We ship out Domino Clamps in the ‘clamped’ position, so you’ll need to undo it first. Using a 10mm hex key (Allen key) undo the central bolt all the way until it won’t undo any further when the circlip meets the back of the clamping plate (don’t force it). If you maintain a bit of forward pressure on the bolt as you undo it, you will notice that the clamping plate rotates as you do this so that it is in an upright position, in alignment with the boss.
Now That the clamp is ready, it’s time to prep the casting. The aim here is to make sure you have a good solid grip on the inside of the casting and that there is nothing going to obstruct the rotation of the clamping plate. Castings are notoriously good spots for nesting birds and animals, so firstly clear out any nesting materials inside, and if possible, use a hard blunt instrument to scrape away any loose rust or debris from the inside surface that you are clamping to. Be careful here, we ran initial tests for these clamps in Spain, and found a scorpion in a bottom casting once, so maybe use a tool for this job first.
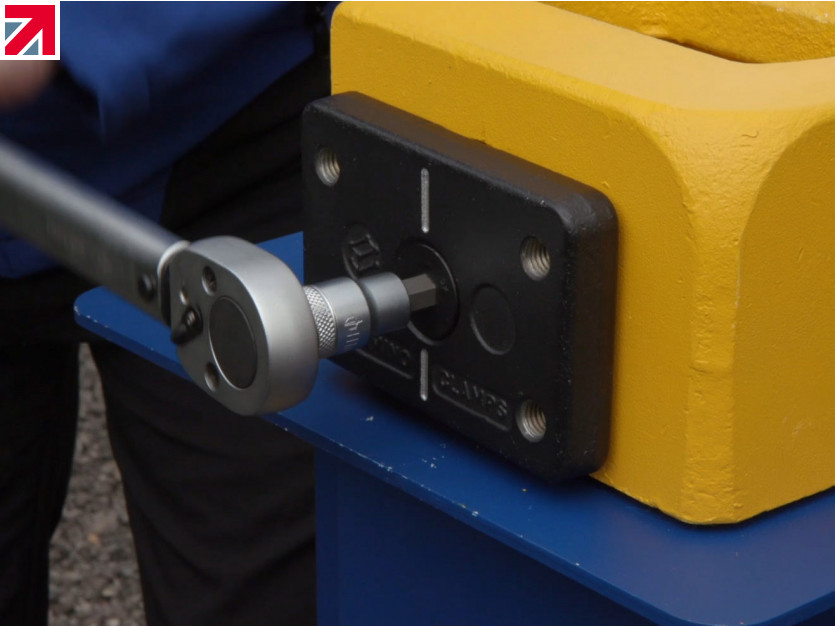
Now you are ready to insert the Domino into the corner casting you need to attach to. Simply hold the Domino the right way up (writing the correct way up) and insert the clamping plate and the boss into either the stadium or shield hole of the corner casting. Let the weight of the clamp bring it down so it is resting on the lower lip of the hole. Now do up the central bolt and get it nice and tight. We advise to do these up to about 35-40Nm, which you can either do precisely with a torque wrench or a long arm hex key. if using a hex key, just do it up about as tight as you can, one-handed.
Attaching things to the Domino clamp
Now the clamp is ready to bolt on whatever you need. check the technical sheet for normal working loads. Don’t exceed these. You’ll also see in the technical sheet that these aren’t to be used to lift a container. There are lots of products for lifting containers that already exist, but that’s not what this was designed for.
NOTE! An important note about high load scenarios. If you are approaching the clamps maximum load capacity it is important to check the bolt’s tightness before and after the load is applied. This check should be repeated when reapplying large loads to the same clamp. If you are unsure about the total load you’re applying, we recommend you employ the services of an engineer to assist you in this operation.
There are a number of things which will bolt directly to the front of the Domino, without the need for any kind of adapter plate, some of which you will find in our shop and instructions in our uses blog. If there is anything you need to connect, but don’t know how, see it in our shop, then please contact us and we will try and find you a solution.
It is important not to use a bolt that is too long for the object you are attaching to it. If the bolt is too long, then instead of securing the object to the clamp, the bolt will go all the way through the clamp snd hit the corner casting. This will mean that you will either not be able to firmly attach the object, or the bolt will exert undue stress on the domino, pushing it away from the corner casting, or both. Add up the thickness of what you need to attach, plus 20mm for the domino, then find one bolt size down from that. Always try to have at least about 15mm of thread in the domino though. For example, if you are attaching a 24mm thick steel bracket to a domino clamp, using 2mm thick washers, that gives a total of 2mm + 24mm + 20mm = 46mm. With 45mm bolts, you'll have 1mm to spare and they'll be perfect for the job.
Undoing the Domino Clamp
To undo the Domino clamp, first make sure that it is no longer supporting any significant load that you can’t take the weight of one-handed, and simply undo the central bolt as you did at the beginning. keep the central bolt in its countersink, and the clamping plate will rotate back into the upright position. You’ll be able to remove the clamp straight out of the hole nice and easily.
Care for your Domino.
As with any piece of Rigging equipment, care should be taken with your Domino clamps to keep them in good shape. Try not to bash them around and when undoing them, don’t undo this bolt so much that it begins to bend the circlip.
The black xylan finish on them should maintain a smooth operation of the central bolt for years, but eventually, this too may need some assistance. A little lubricating oil will help if, after a lot of use, this central bolt has become sticky. With proper care, your Domino Clamps should last for many years and hundreds of uses.
...Happy clamping!
Find out more about Domino Clamps on their member profile page here
Member-created content 5 years ago | By Made in Britain